Simple Image Processing Library
I do a lot image processing both on images and 3D images / volumes. There exist many image processing libraries out there. Some are big and some are small, but none seems to fit my taste. ITK is one of the major image processing libraries used in my field of research, but this library is, in my opinion, extremely cumbersome. And I can’t be the only one who think so since there has been made an alternative called Simple ITK. There exists many other image processing libraries that tries to be simple to use, but most of them don’t allow you to do volume processing, which I do a lot of. I want a library that allows me to quickly go from an algorithm concept to getting actual pictures on the screen so that I can quickly verify the results. So far I’ve been using Matlab for prototyping image processing algorithms, and it have worked quite well, but as I see it Matlab has two major problem: speed and computation and GUI in one thread. A long story short, I’ve made my own Simple Image Processing Library (SIPL) which I now use in my research. I’ve added a short guide here on how to use and install it in case anybody else feel the same as I do and thinks this library could be of any use to them as well. Also, this small little library is still in development so if you have any feedback, suggestions, comments or bug reports please let me know.
Main goals of the library:
- Simple and condensed – Easy to get from an algorithm concept to pictures on the screen
- GUI in separate thread – Display and explore images interactively while computation is still going on
- Cross-platform – Linux, Windows and Mac compatible
Press more below to see code examples, download and read install instruction.
Tutorial
Setup
To start using SIPL you must include the Core.hpp file as shown below. The library is defined in the SIPL namespace and you can use “using namespace SIPL;” to avoid having to write SIPL:: in front of everything.
#include "SIPL/Core.hpp" using namespace SIPL; int main() { // Add your image processing code here } |
Load image from disk and display it
To load an image from disk simply create an image object with the desired data type you want for your image and the filepath as input to the constructor. In the example below I’ve used the data type color_uchar which is a data type consisting of 3 components of unsigned char (0-255) red, green and blue. Other data types are: char, uchar, short, ushort, int, uint, float, color_uchar, color_float, float2 and float3. The display method created a window displaying the image as shown in the picture below. In this window you can use the + and – buttons on your keyboard to zoom in and out.
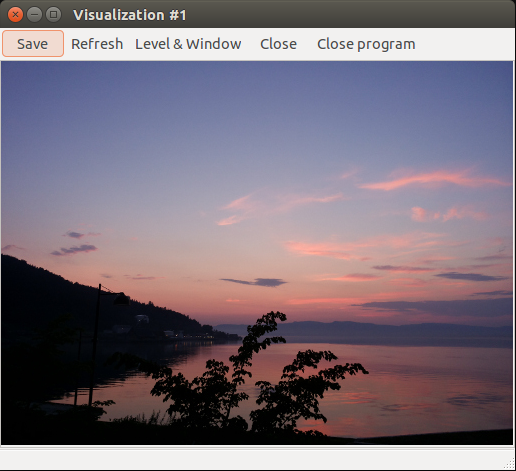
Image<color_uchar> * im = new Image<color_uchar>("images/sunset.jpg"); im->display(); |
Manipulating pixels
To manipulate the pixels of an image you use the set and get functions on the image. You can use both a linear address and a coordinate address: (get(i) or get(x,y))
// Remove all the green from the color image im for(int i = 0; i < im->getTotalSize(); i++) { color_uchar p = im->get(i); p.green = 0; im->set(i, p); } |
Saving an image
im->save("test.png", "png"); |
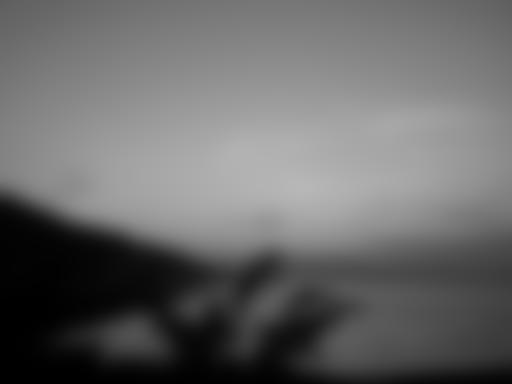
Convert color image to a grayscale image
To convert an image from one data type to another you can pass the image as an argument in the constructor to a new image. Note that not all conversions are possible
// Convert image to grayscale and display it Image<float> * im2 = new Image<float>(im, IntensityTransformation(NORMALIZED))); im2->display(); |
Adjust level and window when displaying an image/voume
// View the image using a custom level(0.5) and window(0.25) im2->display(0.5, 0.25); |
Vector images
Two datatypes that are useful for creating vector images are defined, float2 and float3. float2 has two components: x and y, and float3 has three: x, y and z. These vectors are displayed using colors. Below is an example on how to calculate the gradient of an image.
// Calculate the gradient of the image and display the vector field using colors Image<float2> * gradient = new Image<float2>(im2->getWidth(), im2->getHeight()); for(int x = 1; x < im2->getWidth()-1; x++) { for(int y = 1; y < im2->getHeight()-1; y++) { float2 vector; vector.x = 0.5*(im2->get(x+1,y)-im2->get(x-1,y)); vector.y = 0.5*(im2->get(x,y+1)-im2->get(x,y-1)); gradient->set(x,y,vector); } } gradient->display(0.2, 0.4); |
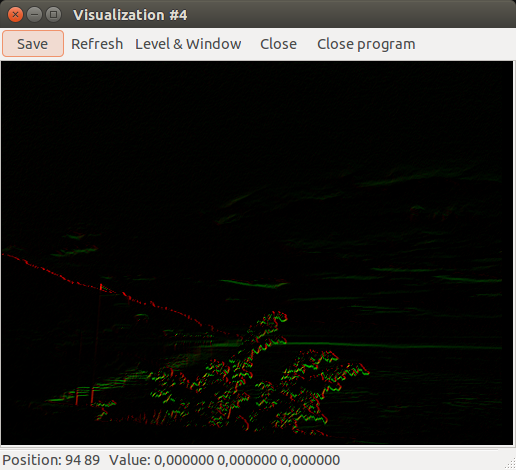
Gradient image of the grayscale sunset image. The colors represents the angle of the gradients and the intensity the length of the gradient
Updating a window
Sometimes you may want to update an image on screen while it is being processed. This can be useful when you do some processing that takes very long time and you want to abort early if something seems wrong. Below is the same gradient example as above, but here the image on the screen is updated when every column is calculated.
// Calculate the gradient of the image and display the vector field using colors Image<float2> * gradient = new Image<float2>(im2->getWidth(), im2->getHeight()); Visualization * w = new Visualization(gradient); w->display(); w->setWindow(0.4); w->setLevel(0.2); for(int x = 1; x < im2->getWidth()-1; x++) { for(int y = 1; y < im2->getHeight()-1; y++) { float2 vector; vector.x = 0.5*(im2->get(x+1,y)-im2->get(x-1,y)); vector.y = 0.5*(im2->get(x,y+1)-im2->get(x,y-1)); gradient->set(x,y,vector); } w->update(); // update the image on screen } |
Load a volume from disk and display it
A separate class is defined for volumes called Volume. It is very similar to the Image class and has many of the same functions. The constructor can be used to load both raw files and metadata (.mhd) files. To load .mhd files only supply the filepath in the constructor. Below shows an example of how to load and display a raw file. When viewing the volume one can use the up and down arrow keys to move through the slices.
// Load volume and display one slice on the screen // (Use arrow keys up and down to change the slice on screen) Volume<uchar> * v = new Volume<uchar>("skull.raw", 256, 256, 256); v->display(); |

One Z slice of the volume of a skull
Viewing a volume
To view a specific slice of a specific direction you can specify this in the display method. The first argument is the slice nr and the second is the viewing plane (X,Y,Z). If you supply nothing to the display function the default is slice = depth/2 and viewing plane = Z.
v->display(100, X); |
One can also specify level and window here as well.
// level = 60, window = 100 v->display(100, X, 60, 100); |
And just level and window:
// level = 60, window = 100 v->display(60, 100); |
Maximum Intensity Projection of a volume
Viewing only slices can be a tedious way to explore a volume. Maximum intensity projection is a simple way to “render” a volume. It does this by sending a ray for each pixel through the volume and selects the maximum value it encounters. The volume class has a method called displayMIP() that will create a maximum intensity projection at a given plane (X,Y,Z), the default is X.
v->displayMIP(); // default is X v->displayMIP(Y); v->displayMIP(Y, 60, 100); // can also use level and window here |

Maximum Intensity Projection of the skull volume

Maximum Intensity Projection of the skull volume from another direction and with a level and window set
Convert volume
Converting volume data types are the same as with images:
Volume<float> * v2 = new Volume<float>(v); |
Manipulate voxels
The volumes also has get and set functions. Below is an example of calculating the 3D gradient of the v2 volume above.
Volume<float3> * vGradient = new Volume<float3>(v->getWidth(), v->getHeight(), v->getDepth()); for(int x = 1; x < v->getWidth()-1; x++) { for(int y = 1; y < v->getHeight()-1; y++) { for(int z = 1; z < v->getDepth()-1; z++) { float3 vector; vector.x = 0.5*(v2->get(x+1,y,z)-v2->get(x-1,y,z)); vector.y = 0.5*(v2->get(x,y+1,z)-v2->get(x,y-1,z)); vector.z = 0.5*(v2->get(x,y,z+1)-v2->get(x,y,z-1)); vGradient->set(x,y,z,vector); } } } vGradient->display(); |

3D Gradient of the skull volume
Save a volume
Saving a volume to a raw file is supported. This is done by calling the save function:
vGradient->save("test.raw"); |
Get access to the underlying data
If you want direct access to the underlying data of the images or volumes you can use the getData() and setData() functions:
Image<color_uchar> * im = new Image<color_uchar>("images/lena.jpg"); color_uchar * data = im->getData(); // Do some manipulation im->setData(data); |
Installation
Linux
Clone/download the code:
sudo apt-get install git # if you don't already have git git clone git://github.com/smistad/SIPL-Example.git cd SIPL-Example # This downloads the SIPL library itself git submodule init git submodule update |
Install the package libgtk2.0-dev.
sudo apt-get install libgtk2.0-dev |
Then compile using cmake and the supplied CMakeLists.txt file:
sudo apt-get install cmake cmake CMakeLists.txt make # Run example: ./example |
Currently tested on: Ubuntu 12.04
Windows
Download the two zip files from https://github.com/smistad/SIPL-Example/archive/master.zip and https://github.com/smistad/SIPL/archive/master.zip.
Extract the SIPL-Example zip file and extract the SIPL zip file inside the SIPL folder in the SIPL-Example directory.
Next, download the all-in-one bundle of GTK2 for windows from this page http://www.gtk.org/download/win32.php (direct link: http://ftp.gnome.org/pub/gnome/binaries/win32/gtk+/2.24/gtk+-bundle_2.24.10-20120208_win32.zip). Then extract the contents of the zip file.
Add the location of the bin folder inside the extracted contents to your PATH. This is done by right clicking “My Computer”, select advanced settings and then press environment variables. Scroll down to find the Path variable and add “;C:/pathtowhereever/gtk+-bundle_2.24.10-20120208_win32/bin”. Then you can download the Win32 cmake installer from http://www.cmake.org/cmake/resources/software.html, install it. When running cmake select the folder where the CMakeLists.txt file exists and press configure. Select which type you want cmake to created, for instance a Visual Studio project file. Press generate and you can open generated the visual studio project file and compile.
Currently tested on: Windows 7 64bit with Visual Studio 2010
Mac OS X
Install GTK for Mac OS X (see http://www.gtk.org/download/macos.php.


It is possible to load frames from video?
what are the allowed formats?
it is possible to pass to RGB to RGBY to be used as ucghar4 arrays in opencl?
Thank you for the lib and best regards!
hi….i downloaded your files….but i have a problem Visualization.hpp wich is included in the example is missing from the folder SIPL
Make sure you download the correct version either using this link https://github.com/smistad/SIPL/tree/760f2ecab9bc68b0fc8ca3d56befd4ed62180a00
or the git commands:
git submodule init

git submodule update
Thanks Erik for your codes!
I have a problem, when I want to cmake TubeSegmentation, I get an error:
——————
CMake Error at CMakeLists.txt:32 (find_package):
Could not find a configuration file for package SIPL.
Set SIPL_DIR to the directory containing a CMake configuration file for
SIPL. The file will have one of the following names:
SIPLConfig.cmake
sipl-config.cmake
CMake Error at CMakeLists.txt:33 (include):
include called with wrong number of arguments. Include only takes one
file.
————
I have installed and built SIPL but cannot fine the CMake configuration file.
I have encountered the same problem. Would Erik please have a look at this? Thanks!
Make sure SIPL is a subdirectory of Tube-Segmentation-Framework and that the code is present there.
I’m trying to use the SIPL library under windows 8.1 x64, and VS2010, and having a couple of problems:
1. Both int2::distance and int3::distance used sqrt without specifying a conversion to float, so it caused a disambiguation and did not compile. Fixed it.
2. Had to add the gtk lib folder to the lib search path.
3. After those the code compiles, but the image does not load properly and i’m getting the following errors:
(example.exe:7744): Gtk-CRITICAL **: gtk_image_get_pixbuf: assertion `image->storage_type == GTK_IMAGE_PIXBUF || image->storage_type == GTK_IMAGE_EMPTY’ failed
(example.exe:7744): GdkPixbuf-CRITICAL **: gdk_pixbuf_get_height: assertion `pixbuf != NULL’ failed
I am aware of problem 1 and 2, but I have not seen problem nr 3 before. I will check it out and come back to you.
It works fine here, however I’m compiling as 32 bit, and it seems you are compiling as 64 bit. Perhaps this is a problem with the 64 bit version of GTK?
what about dipimage from http://www.diplib.org ?
i like its semantics unfortunately it only works in matlab.